|
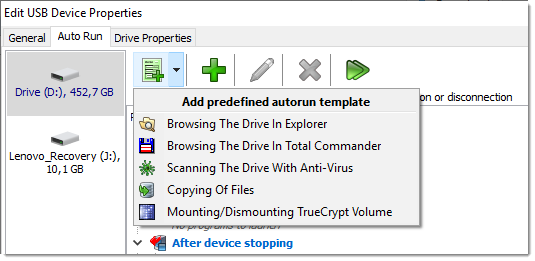
Add one of predefined command line autorun templates. Read more about usage of predefined autorun templates below. |
 | Add new command line for a process autorun. |
 | Edit selected process command line. |
 | Remove selected process from auto launching. |
 | Make a test run of selected process. |
 | Make a test run of a selected process group. |
Link to global autorun settings. Proceed this link if you
want to setup launching of programs not for given device, but for all
visible devices in USB Safely Remove. Also you can access global autorun
settings by double-clicking to global autorun process line or via main
menu -> Options -> "Global Autorun" tab.
Run "After device plugging" processes on Windows startup.
If you enable this checkbox all processes specified in "After device
plugging" section will be launched on Windows startup as well.
This option is useful when your external drive contains portable
applications you need to work or you store all required for work
information on the external drive.
Wait for the process to finish.
This option can be set up in the adding/editing process command line
window. If it is checked, USB Safely Remove will wait until this process
finishes and only then it runs next process in the section. If this
option is unchecked, USB Safely Remove will run this process and
immediately proceed to the next process. It is checked by default.
Hide the process while running.
option can be set up in the adding/editing process command line window.
When it is checked the specified process will be run in a hidden mode,
when it is unchecked the process will be run in normal mode and will be
seen on the display. By default it is unchecked.
"Global" Autorun
Global autorun settings are applied to all hot-plug devices visible by USB
Safely Remove. It means that if you add an application into "Launch process
after device connection" it will be launched on connection of any hot-plug
device.
Global autorun can be set up in the
Options window.
Global autorun setup is similar to setup of processes in local autorun
except two additional features:
- "Launch the process for drives only" option.
This option allows process auto launching only for storage devices and
prevents the process from being launched for non-storage devices. I.e.
do not run an antivirus program on connection of a mouse or a USB scanner.
This option is available in adding\launching process command line window.
- Drop-down menu with the list of devices. This menu lets you
make a test run of a process in global autorun list with settings
of a selected device.
Adding/Editing process command line window
This window aimed to set up an application startup parameters, such as its file-name, command line parameters, whether it is visible on run or not and etc.
The window consists from the following components:
- Process command line. In this field you must specify a full path and file name of the application. Path and file name must be wrapped by quotes if there are spaces in the command line. Also this string may contain (and it usually contains) command line parameters which pass to the process parameters of the device which this process will be launched for.
In order to specify launching an application from the device you can use the following options:
1) "%DriveLetter%\YourProgram.exe"
2) "\YourProgram.exe"
- Find a program.... This button opens "Open file" dialog window which lets you find needed application.
- Run process. If you have already set all the required parameters to launch the process you can make a test run of the process just to check if the process runs correctly and all required for it parameters are passed appropriately.
- Command line parameter templates.
Parameter templates are special parameters of the process command line which will be replaced by real parameters of the device when the process will be launched for it. Usage of parameter templates instead of actual parameters is required because actual prameters can change. For example you should not specify in the command line real letter of your pen drive because it can change on next insertion (or you can change the letter manually) and an assigned application will be launched with incorrect parameter. So you have to specify %DriveLetter% in the command line instead of e.g. "h:". In the adding\editing process command line window you can see all the parameters and add required to the edited command line with a double mouse click.
Description of available parameter templates:
- %DriveLetter% - the drive letter, including colon (e.g. C:).
- %DriveLetterOnly% - just the letter of the drive without colon (e.g. C).
- %PnPName% - PNP Name (or Device Instance ID). It is a system-supplied device identification string that uniquely identifies a device in the system. A Pnp name of the device is persistent across system boots.
Example of PNP name: USB\VID_08EC&PID_0015\0791235011E239B8
- %DeviceName% - device name. It is a name device how you can see it in USB Safely Remove. Initially it is an internal name given by a device manufacturer, however you can change it in device properties so a changed name will be passed to the called application as %DeviceName% parameter.
- %Label% - volume label. It is just a drive name which you can see and change in Explorer
- %PhysicalDriveName% - physical drive name.
It is a unique name assigned by a system to a drive (or drive partition) which is persistent across system boots. Can be used for an integration with such programs like TrueCrypt which needs to work directly with disk partitions.
Example of physical drive name: \Device\Harddisk6\DP(1)0-0+e.
Autorun can be set up separately for each drive of a multidrive device.
For example if you have a device having G:, H:, I:, J: drive letter, you can assign a program to be launched only for G: and H: drive letters.
When autorun triggers it will launch applications assigned to drive G:
and pass them all parameters of drive G: and then it
will launch applications assigned to drive H:.
Autorun will not trigger for I: and J: drives.
- Process description field.
You can define here a short description of the launched process or its
performed action. You will see this string in the autorun process list.
If you leave this string empty a process command line will be displayed
in the list (fig. 1).
- Allowing/forbidding process launching.
With this option you can deactivate process launching on operations with
the device.
- Hide process while running.
If you enable this checkbox the process will be launched in a hidden mode,
i.e. its window will not be displayed.
- Wait for the process to finish.
If it is checked, USB Safely Remove will wait until this process finishes
and only then it runs next process in the section. If this option is
unchecked, USB Safely Remove will run this process and immediately
proceed to the next process. It is checked by default.
- Launch the process for drives only.
If this checkbox is enabled the process will be launched only for storage
devices (The option is available only in "Global Autorun" settings).
- Close the process before device stopping.
If this checkbox is enabled the process will be closed before device
stopping. The two modes of this feature are available:
-
Close the process. The program sends a closing command ot app.
However some apps cannot react to this command or the app is busy
at this moment and cannot be closed. In most cases it is recommended
to use this way to close the process;
-
Kill the process. The program kills the process forcibly. The app
will be closed even if it does some actions and has unsaved data.
You should use this method only if there is no risk to lose any
important data in the application.
Predefined Program Autorun Templates
For your convenience we have included into USB Safely Remove command lines of many popular applications. This great ability enables you to set up automatic scanning of your external drive with your antivirus program, mounting\dismounting flash drive-based TrueCrypt volume and many other things. To choose one of the predefined autorun templates just click " Add predefined autorun template" button.
Autorun Setup Samples
Notes on creation of command line
- Path and file name of the launched application must be quoted in case if there are spaces in the path or file name, e.g.: "C:\Program Files\My Program.exe". If there are no spaces you may not use quotes, e.g.: C:\MyProgram.exe. Every parameter must be quoted as well if it contains spaces.
- If an application is a standard Windows application, such as Explorer or Calculator, you may not specify a ful path to executable file, e.g. you can specify this command lines to launch Explorer: explorer, and to launch calculator: calc.
- If an application is launched directly from a drive of the device you setup autorun for, you must omit a device drive, e.g.: \MyProgram.exe.
1. Scanning a connected flash drive with NOD32 antivirus
Scanning a flash drive with an antivirus should be done on external drive
connection. In this case the given command line have to be added into
"After device plugging" section of Global or Local autorun.
In order to create a command line to launch NOD32 you have to:
- Specify a path to the antivirus executable file wrapped by quotes, e.g: "C:\Program Files\ESET\nod32.exe"
- NOD32 requires the only parameter - path to scan. Path to scan will
be drive letter of our device, so you can specify template parameter %DriveLetter%
Finally the command line will look like this:
"C:\Program Files\ESET\nod32.exe" "%DriveLetter%\"
2. Using system commands of Windows
In example below we use system command
xcopy (copying of files), using it you can implement a simple
data backup on external drive stopping\connecting.
If you want to save files from flash drive to your hard drive before
device stopping given below command line must be added into
"Before device stopping" section of the device autorun process list.
A pattern of command line to use:
xcopy /e /h /y "Copy From" "Copy To\"
Using parameters:
- Parameter "/e" is used to copy all subfolders including empty.
If you do not want to copy empty folders, use "/s" instead "/e"
- Parameter "/h" defines whether system and hidden files will be copied.
By default xcopy does not copy system and hidden files.
- Parameter "/y" prevents asking you to confirm rewriting
of the destination file.
If you want to backup all the flash drive before its stopping, you
can use "%DriveLetter%" parameter as a source for copying.
Finally the command line will look like this::
xcopy /e /h /y "%DriveLetter%\" "C:\Temp\"
If you need to create more complicated scripts to run files, you can use
batch files (.bat or .cmd) or JScript Shell files in which specify several
applications to launch.